A Practical Guide For Cutting Wood
Wood is not passive, it’s got structure, direction and memory encoded in every fibre and to me, before a saw ever touches the surface, the wood is already telling you something about how it wants to be cut.
Understanding that language is where good woodworking begins.
This guide covers the full territory: grain and its implications, every major category of cutting tool, the specialized methods that define particular trades, and the workholding systems that make precision possible.
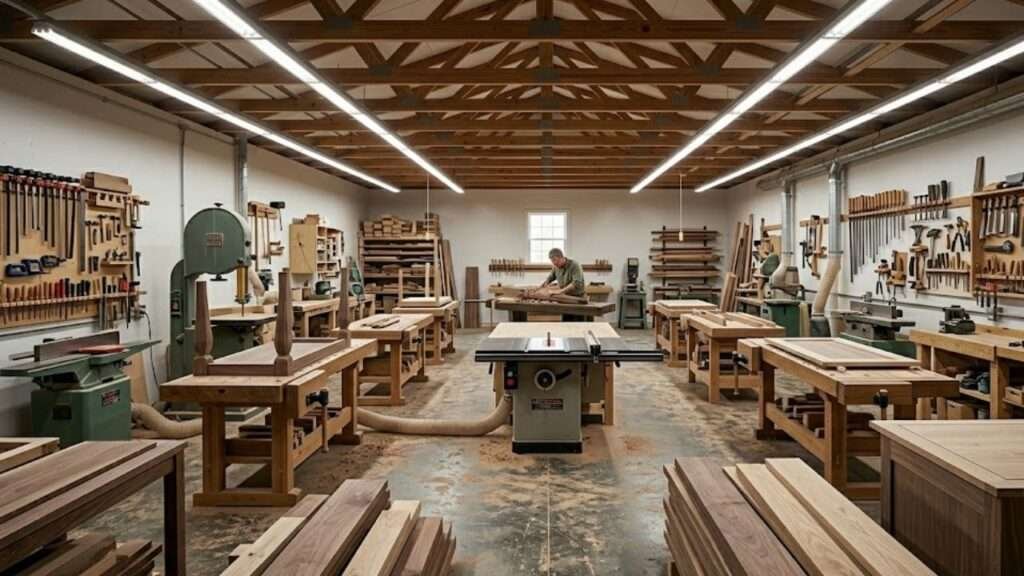
Whether the woodshop is your backyard shed or a converted garage bay with a single table saw or a dedicated studio equipped with a full hand tool collection, the principles here apply.
The Wood Itself: Grain, Structure and Why the Direction of the Cut Matters.
Every piece of timber is a bundle of long cellulose fibers bound together by lignin.
Those fibers run in one direction, and that direction determines everything about how the wood responds to a blade.
Cutting with those fibers, against them or across them produces three fundamentally different experiences and three different surface qualities.
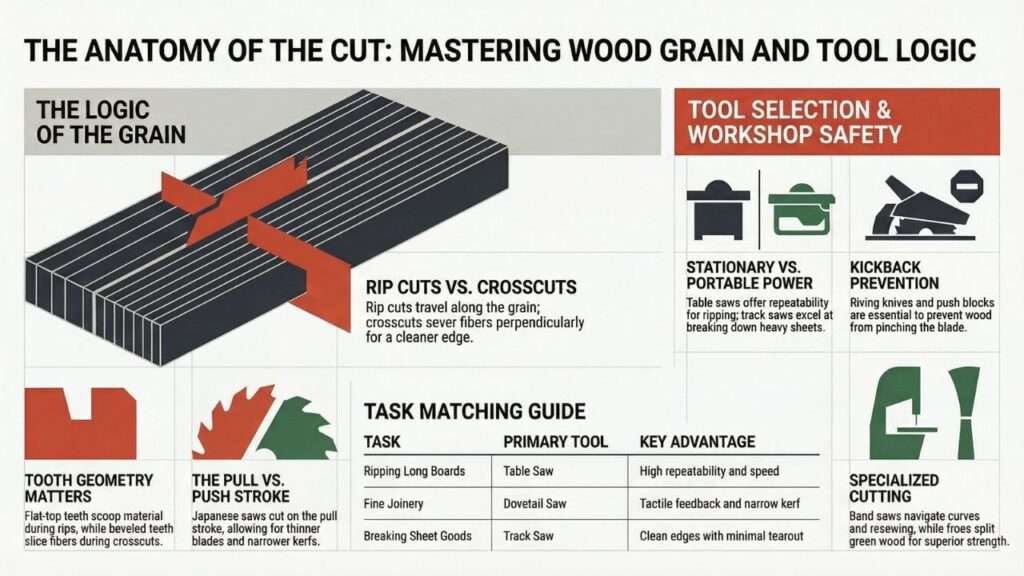
A rip cut travels along the grain, parallel to the length of the board. The teeth of a rip saw are shaped like small chisels with flat tops, designed to scoop material out of the kerf rather than slice cleanly across it.
The cut is fast and slightly rough. A crosscut travels perpendicular to the grain, severing those long fibers rather than splitting between them.
Crosscut teeth are shaped differently, beveled on alternating faces to act like small knives, slicing each fiber before lifting the waste.
The result is a much cleaner edge. Curved and freeform cuts move across grain at varying angles and require tools with fine, narrow blades that can follow a radius without binding.
This is not merely academic. A rip blade used for a crosscut will tear the surface fibers into ragged splinters along the exit edge of the cut, particularly in hardwoods and plywood.
A crosscut blade used for ripping will work, but the narrow gullets between teeth will pack with sawdust and generate heat, slowing the cut and shortening blade life. Matching the tooth geometry to the cut direction is a foundational habit.
It affects surface quality, tool longevity and the physical effort required.
Quartersawn and flatsawn boards respond slightly differently to the same blade. In quartersawn material, the tight vertical grain tends to cut cleanly across its face but can be more resistant along its edge.
Flatsawn boards with wide cathedral grain are more prone to tearout near the apex of the figure, particularly in species like oak or ash where the ray cells create pronounced texture.
These are small things, but they explain why the same saw produces different results on different days with different timber.
Hand Saws: The Case for Quiet Precision.
Power tools dominate the conversation in most woodworking
content, but hand saws deserve attention on their own terms rather than as a
lesser alternative.
They are quiet. They produce far less dust.
They give the operator a level of tactile feedback that no
power tool can replicate. And modern hand saws are dramatically better than the
blunt, battered carpenter’s saws that most people associate with the category.
Western-style saws cut on the push stroke. They are built
with thicker plates and stiffer spines to resist buckling under forward
pressure.
A rip-cut panel saw, typically 22 to 26 inches long with 5
to 7 teeth per inch, handles the initial breakdown of rough lumber along the
grain.
The wide gullets clear material efficiently, and the
flat-top tooth geometry shears fibers cleanly with each push.
A crosscut panel saw, the same size but with 8 to 12 teeth
per inch and beveled teeth, cuts stock to rough length before finer tools take
over.
Backsaws are the precision instruments of the Western hand
saw family.
A carcass saw or tenon saw carries a reinforced brass or
steel spine along the back edge, limiting the depth of cut but guaranteeing a
straight, controlled stroke. Medium tooth count, typically 12 to 16 teeth per
inch, produces a surface fine enough for joinery without being slow.
The dovetail saw takes this further. At 15 to 20 teeth per
inch with minimal set, meaning very little flare on the teeth, it leaves a
surface that needs no cleaning up. The kerf is narrow, the walls are vertical
and the fit of a hand-cut dovetail cut with a good dovetail saw is noticeably
different from one cut by machine.
Japanese-style saws cut on the pull stroke. Because the
blade is under tension rather than compression during the cutting stroke, the
plate can be made thinner, producing a narrower kerf and removing less
material.
Many Japanese saws use impulse-hardened teeth, meaning the
tooth tips are hardened to a degree that conventional files cannot touch.
They cannot be resharpened in the traditional sense, but
they hold their edge considerably longer than Western teeth.
The Ryoba is I feel the most practical choice for a
versatile hand tool kit: one edge carries rip teeth, the other carries crosscut
teeth.
The Do-zuki is the Japanese equivalent of the tenon saw,
with an exceptionally thin plate and fine crosscut teeth that leave a surface
resembling polished glass.
The Kataba is a single-edged, backless saw for deep cuts
where the spine of a Do-zuki would bottom out before the cut was complete.
The coping saw sits apart from these categories. Its
U-shaped steel frame holds a thin, replaceable blade under tension, allowing it
to cut curves, internal shapes and the waste between dovetail pins.
It is a slow tool and a surprisingly satisfying one,
particularly for the kind of close, concentrated work that hand joinery
requires.
Stationary Power Saws: The Architecture of the Workshop.
The stationary saws define a workshop’s capabilities more
than any other category of tool. They are heavy, accurate and designed for
repeatability.
Each one is optimized for a different set of tasks, and
understanding what each does well, and what it cannot do, shapes how a shop is
laid out and how work flows through it.
The table saw is the axis around which most woodworking
shops are organized.
A circular blade protrudes through a flat table, and stock
is fed into it along an adjustable fence for ripping or across it using the
miter slots for crosscutting.
Cabinet saws, the heavy industrial variants built into full
steel enclosures, deliver the power and mass needed for sustained production
work on hardwoods.
Contractor and hybrid saws trade some of that mass for
portability.
The table saw’s strengths are well known: it rips long
boards with absolute repeatability, cuts dados and rabbets with a stacked blade
set, and with a good crosscut sled, handles precise trimming with a level of
accuracy that few tools match. Its limitation is specific and worth naming
directly.
A table saw with a missing or bypassed riving knife
introduces a genuine kickback risk when ripping.
The riving knife, a thin metal fin mounted directly behind
the blade, prevents the kerf from closing on the blade as the wood passes.
Without it, any tension in the wood that causes the cut to
pinch can throw the board back toward the operator with significant force. It
is not a theoretical risk.
The miter saw, sometimes called the chop saw, brings the
blade down onto stationary stock held against a back fence.
A basic miter saw pivots left and right to cut angles in the
horizontal plane.
A compound miter saw also tilts the blade head to cut
bevels, essential for complex trim work where both the angle and the bevel
change at once.
The sliding compound miter saw adds rails that allow the
blade to travel forward through the cut, extending the width of material it can
handle.
The miter saw’s domain is crosscutting: cutting moldings,
frame members, stair parts and structural timber to precise lengths and angles.
It does not rip.
Its width capacity, even on a sliding model, is limited to
roughly 14 to 16 inches.
For long boards that need to be cut to length, the feed-in
and feed-out clearance required by the sliding rails can be considerable, which
is worth factoring into workshop layout.
The band saw is, in some respects, the most underappreciated
tool in the workshop. Its continuous blade loop runs over two rubber-tired
wheels, producing a smooth, low-vibration cut with almost no kickback risk.
It excels at resawing, the process of slicing a thick board
into thinner slabs along its face, producing bookmatched panels or thin veneers
that a planer cannot generate. It handles curves of any radius limited only by
blade width.
A 3/4 inch blade will follow a gentle arc; a 1/8 inch blade
will navigate tight curves in small stock.
The band saw is also the correct tool for cutting tenon
cheeks and for trimming irregular or live-edge stock that cannot safely be run
past a table saw blade. Its weakness is consistency on perfectly straight cuts,
which requires a sharp, properly tensioned blade and a well-set fence.
Portable Power Saws: Taking the Work to the Material.
Large sheet goods present a problem that stationary saws
solve poorly. A full sheet of 3/4 inch plywood is 4 by 8 feet and weighs around
60 pounds.
Feeding it across a table saw is possible with the right
outfeed support, but handling it alone is difficult and positioning it
accurately is harder still.
Portable saws exist, in part, to solve this problem.
The circular saw, often called by the brand name Skilsaw, is
the most widely used portable saw in building and woodworking.
It is a motor-driven circular blade in a handheld housing,
guided by the operator or by a clamped straightedge. Sidewinder models have the
blade mounted directly on the motor shaft, making them lighter and more
compact.
Worm drive models use a geared transmission to place the
motor at the rear, adding weight but increasing torque, which is why they
remain the preferred tool on timber framing sites.
Accuracy with a circular saw is entirely dependent on setup.
A well-clamped straightedge fence and a sharp blade produce a workable result;
a freehand cut in thick hardwood is a different proposition.
The track saw refines the circular saw’s concept
substantially.
A purpose-built saw rides on an aluminum extrusion with a
rubber anti-splinter strip along its cutting edge.
The result is a cut that rivals a table saw in straightness
and dramatically reduces tearout on veneered plywood.
It is the correct tool for breaking down sheet goods
efficiently and cleanly, and it requires no outfeed space or material handling
support.
The trade-off is cost. A quality track saw system, saw plus
two or three track lengths plus connectors, represents a meaningful investment,
and the proprietary nature of most systems means blades and accessories are
brand-specific.
The jigsaw handles curves and internal cutouts in material
too thick or awkward for a scroll saw.
Starting from a drilled hole, a jigsaw can cut freeform
shapes, circles with a trammel attachment and notches that no other portable
tool can manage.
Blade deflection in thick material is its persistent
limitation: the thin reciprocating blade tends to angle away from vertical in
dense hardwood, leaving a bevel on the cut wall that must be corrected by a
router or hand plane.
Specialized Cutting: Methods at the Edges of the Craft.
Beyond the mainstream tool categories, a number of
specialized cutting methods define entire disciplines within woodworking and
timber work.
The scroll saw is a stationary reciprocating saw with an
extremely fine blade held between two arms.
It is the tool for fretwork, marquetry inlay, decorative
pierced panels and the intricate silhouette cutting that appears in folk art
traditions and contemporary furniture embellishment.
Of all the power saws, it presents the least risk of injury,
and it rewards patience and a light touch rather than speed or force. The work
produced on a scroll saw has a character that is impossible to replicate with a
router or laser.
Chainsaw milling sits at the opposite end of the scale. A
chainsaw fitted with an Alaskan mill attachment, a long aluminum bar that
clamps to the blade and rides along a guide, can rip a felled log into rough
slabs.
The process is slow, physically demanding and produces
lumber that requires substantial further drying and surfacing.
It is however, the only practical method for converting a large
fallen tree into usable timber without a commercial sawmill.
The live-edge slabs that appear in contemporary furniture,
with their natural bark borders and undulating surfaces, often begin their life
on a chainsaw mill in someone’s garden.
The froe and maul belong to green woodworking, the tradition
of working with freshly cut, unseasoned wood. A froe is a broad, chisel-like
blade with the handle set perpendicular to the edge.
Driven into the end grain of a split log with a wooden maul,
it follows the natural grain planes of the wood rather than cutting across
them.
The resulting riven piece has unbroken fibers that run
parallel to the surface, producing strength that sawn timber cannot match.
Chair legs, shingles and spoon blanks split from green wood
with a froe are structurally superior to sawn equivalents.
This counter-intuitive point is worth sitting with: a split
surface is actually stronger than a sawn one, because sawing cuts fibers while
riving follows them.
Laser cutting occupies a different category again. A focused
high-energy beam vaporizes wood rather than cutting it mechanically.
The precision is exceptional, capable of tolerances measured
in fractions of a millimeter, and complex two-dimensional shapes that would
require hours of jigsaw and scroll saw work can be produced in minutes.
The limitations are real and specific. Most hobby and small
studio laser cutters are restricted to materials under approximately 6
millimeters thick.
The cut edge carries a visible char mark that requires
sanding or finishing to remove and the equipment demands proper extraction and
filtration, since the smoke produced by burning wood contains compounds that
require careful management.
Blades: The Half of the Equation That Changes Everything.
A saw is only as effective as the blade mounted in it. Two
identical table saws fitted with different blades will produce results so
different that they might appear to be separate tools entirely.
The grain of a freshly crosscut piece of cherry, the slight
burnish left by a high-tooth-count blade, is one of the quieter pleasures of
the workshop.
Tooth count, expressed as teeth per inch for hand saws or
total tooth count for circular blades, governs the trade-off between speed and
surface quality.
A 24-tooth rip blade on a 10-inch table saw removes material
aggressively with large, widely spaced gullets that clear sawdust efficiently.
A 60-tooth crosscut blade on the same saw leaves a surface
that requires minimal sanding, but cuts more slowly through dense material.
Combination blades with 40 to 50 teeth and mixed tooth geometry attempt to
serve both purposes acceptably, and they succeed well enough for general
workshop use.
Tooth geometry matters as much as count. Flat-top grind
teeth, abbreviated FTG, are used on rip blades. Alternate top bevel teeth, ATB,
alternate between left and right bevels to act as slicing knives on crosscut
blades.
Triple chip grind, TCG, alternates between a flat tooth and
a chamfered tooth, and is used for cutting abrasive materials such as MDF,
laminate-faced boards and some hardwoods.
Kerf width affects both cut quality and motor demands.
Full-kerf blades at approximately 3.2 millimeters resist deflection under load
and are suited to powerful cabinet saws.
Thin-kerf blades at approximately 2.4 millimeters require
less motor power, generating less heat and producing less waste, but they
deflect more readily under side pressure.
For jobsite saws and compact table saws with smaller motors,
thin-kerf blades are often the better choice.
The dado stack deserves its own mention. Used only on a
table saw, a dado stack consists of two outer blades and a set of chipper
blades that are stacked together to produce a wide, flat-bottomed groove in a
single pass.
It is the standard method for cutting the dadoes, rabbets
and housing joints that appear in carcass furniture, bookshelves and drawer
construction.
For my thinking, no other method produces the same
combination of speed, flatness and adjustability.
Tool Selection by Task: A Reference Framework.
Matching the tool to the task is more efficient than working
backward from the tools available. The following table covers the most common
cutting scenarios and the optimal choices for each.
Task | Primary Tool | Alternative | Key Consideration |
Ripping
long boards | Table
saw with rip blade | Band
saw | Riving
knife must be in place. |
Crosscutting
to length | Miter
saw | Crosscut
sled on table saw | Miter
saw is faster; sled is more precise for small parts. |
Breaking
down sheet goods | Track
saw | Circular
saw with fence | Track
saw produces cleaner edges with less tearout. |
Cutting
curves in thick stock | Band
saw | Jigsaw | Band
saw is more accurate; jigsaw offers portability. |
Fine
joinery (dovetails, tenons) | Dovetail
saw or Do-zuki | Table
saw with dado stack | Hand
tools produce a different aesthetic; power is faster at scale. |
Intricate
fretwork or inlay | Scroll
saw | Coping
saw | Scroll
saw handles far greater detail; coping saw needs no power. |
Resawing
thick slabs | Band
saw | Industrial
band saw mill | Blade
tension and guide setup are critical for straight results. |
Cutting
from a log | Chainsaw
mill | Commercial
sawmill | Results
require drying time before use. |
Splitting
green wood along grain | Froe
and maul | None | Produces
stronger material than any sawn equivalent. |
Workholding and Safety: The Conditions That Make Cutting
Possible.
Accurate cutting depends on stable material. A board that
shifts, pivots or vibrates during the cut produces an inaccurate result at
best.
The workholding systems used alongside saws are not
secondary considerations; they are the conditions under which everything else
functions.
The bench vise is the foundation of hand tool work. Stock
held in a properly tensioned vise does not move.
A leg vise or a quick-release bench vise allows the height
and angle of the workpiece to be adjusted before the cut begins.
For power tool work, clamps of every configuration take over
this function.
F-style clamps and parallel-jaw clamps secure fences and
sacrificial boards to the table; quick-grip clamps handle workpieces of varying
thickness; spring clamps hold small parts in position while glue sets or marks
are transferred.
Push sticks and push blocks are non-negotiable accessories
for the table saw and router table. They keep hands away from the blade while
maintaining enough pressure and direction on the stock to prevent it from
drifting.
A purpose-made push block with a heel that engages the
trailing edge of the board offers far better control than a simple stick,
particularly on narrow rip cuts where the fence is close to the blade.
Featherboards, spring-loaded fingers clamped to the table or
fence, press stock against the fence and down onto the table surface throughout
the cut.
They prevent the board from lifting and reduce the chance of
kickback on a table saw. Roller stands support the outfeed end of long boards
on miter saws, table saws and band saws. Without outfeed support, a heavy board
will pivot downward as it clears the blade, potentially pulling the trailing
end of the cut out of alignment and creating a bind.
The crosscut sled is one of the most useful jigs in a table
saw-based workshop. Built from plywood or MDF with runners fitted to the miter
slots, a sled carries the workpiece through the blade on a perfectly controlled
path.
It is more accurate than the miter gauge alone, handles
small parts safely that would be dangerous to cut freehand and allows fine
trimming operations that would otherwise require a separate precision tool.
Blade guards and riving knives are fitted to saws for
reasons that become obvious the first time stock binds in a kerf.
The guard covers the spinning blade above the table; the
riving knife follows the blade’s path and keeps the kerf open. Removing them
for better visibility is a common practice, particularly among experienced
operators who have developed reliable habits.
The article is not the place to advocate either position,
but both devices exist because the failure modes they address are real and
specific.
Closing.
Cutting wood is where a piece of furniture begins its
physical existence.
Every subsequent step in the making process, the joinery,
the surface preparation, the finishing, depends on the quality of the cuts that
preceded it.
A clean crosscut leaves a surface that barely needs a plane.
An inaccurate rip leaves a board that will fight every joint it enters.
The range of tools available for cutting is broad enough to
serve anyone from the apartment dweller with a Japanese pull saw and a shooting
board to the professional with a fully equipped cabinet shop.
What unifies all of them is the same underlying logic:
respect the grain, choose the tooth geometry to match the cut direction, hold
the work securely, and let the tool do what it was designed to do.
The satisfying sound of a sharp saw moving cleanly through dry hardwood is not incidental to the craft.
It is confirmation that the right tool is being used in the right way.